DIY Painted Easter Decor
- Mar 6, 2017
- 4 min read
Hello, hello!
Easter (and hopefully, spring as well) is upon us and I felt that my place could use a little sprucing up for the season, so I decided a DIY was in order. What was the DIY project I had in mind? Painted eggs.
I went to HomeGoods the other day and found some really pretty plates (pictured below) designed by Ciroa and took inspiration from them. Of course, they decided to come home with me and celebrate Easter at our house! YAY! So kind of them.

It's been a little dreary in Seattle lately, so some color was definitely needed in our home! After browsing the plethora of bunny-themed decor at HomeGoods (cute, but so overwhelming), I decided to do something more simple and get some inexpensive Easter eggs from Dollar Tree to accent the plates. I'm talking 36 eggs for under $3.00. YES!
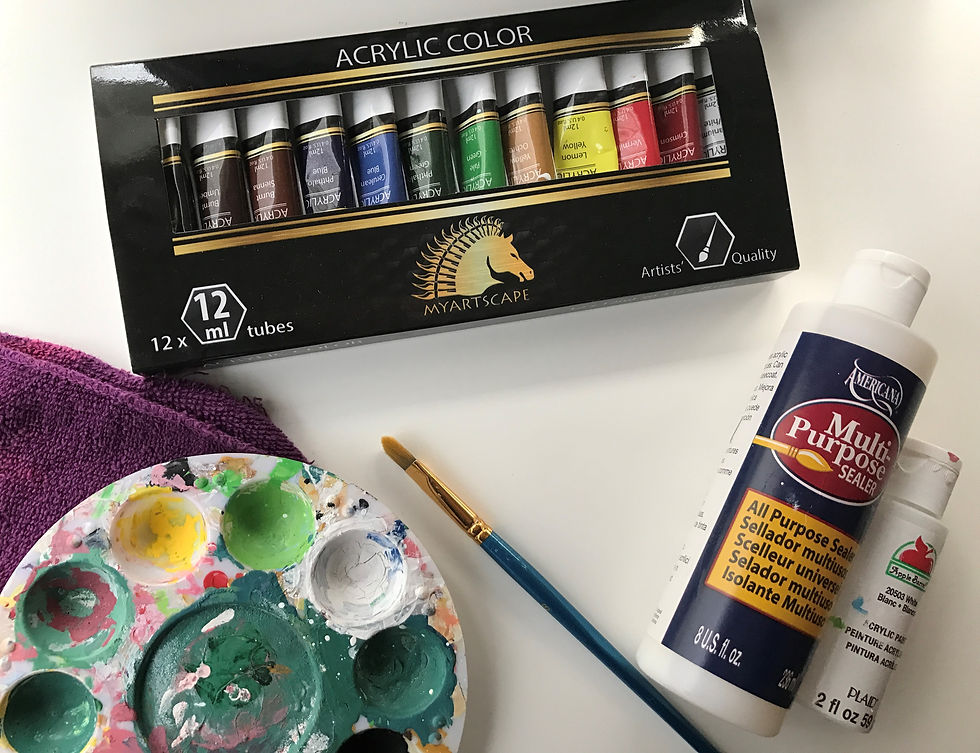
My husband had also bought me some acrylic paints for Christmas and I thought that this would be a perfect use for them! They certainly don't have to be expensive, but if you're curious, here's what art supplies I used:

1) MyArtscape™ Acrylic Paint Set (12 x 12ml Artist Quality Paints): Link
2) Heartybay 10 Piece Paint Brush Set (Nylon, Blue): Link
(I used the "Filbert" brush, a.k.a. the "Langue de chat", "Katzenzunge"... Why do other languages get to call them cat tongues when it's a "Filbert" in English?)
3) Americana Multi-Purpose Sealer: Link
4) Apple Barrel White Acrylic Paint: Link
(Also found at craft stores and Walmarts!)
5) An old washcloth
6) An old paint tray
7) A cup of water
8) Paper towels for extra clean up (>.<)
Other recommendations: Definitely use some newspaper or some kind of covering for your floor / table! I apparently didn't use nearly enough... And prep for a mess. If you don't like being covered in paint, perhaps wear some rubber gloves. And don't wear any jewelry or clothing you really like!!! Especially rings! Here's why (and this was after wiping off almost all the different colors):
With my supplies and some inexpensive, plastic Easter eggs, I set of on a DIY adventure!
*Please note: these are not going to look like "expensive" eggs. But, for fun and inexpensive Easter decor, they'll be worth it!*
Step 1: Lay Out the Supplies
First, I set out paper and opened the packets of eggs. I opened each egg (sans the gold ones) and laid them out in their paired halves, round side up.
Optional: Wear colorful socks! ^-^
Step 2: Sealant
I then set out to paint the eggs with a base coat of half sealant and half white, acrylic paint.
Please don't skip this step! The sealant / paint mix is important to keep the paint on the eggs' slick surfaces!
(It is looking more like I covered everything in mayonnaise at this point, but trust me. It will turn out! Just make sure to put two coats of the mix on!)
Step 3: Colorful Paint
Once I had painted on two coats of the mix (it definitely doesn't go on evenly, so just roll with it), I mixed up paints to match the colors on my new plates!
Tip: Paint an egg in a color similar to the one already on the egg. It will keep the eggs from taking on a strange variation of the color you intended. How do I know? I painted a green egg orange... it needed extra paint to hide the green showing through! Puce is not one of my favorite colors...
Also, purple is one of the most difficult colors to mix, so make sure to do some research or just simply buy the color of purple you would like to paint your eggs!
(See? I told you! Now, look at those eggs. It only took a single coat of paint to get these looking new. :D)
Step 4: Speckle / Splatter Painting
This was definitely an experimental phase. And what I learned is this:
1) Make sure you mix a good solution of the sealant, white acrylic paint, and water. The paint needs to be a little loose to be able to get off of the paint brush when you speckle / splatter paint.
2) Don't use your fingers against the brush's bristles. You'll only be painting your hand.
3) Hold the paintbrush firmly and flick it with your index or middle finger to create the speckle / splatter effect. You can adjust where you hold the brush for more control over where the paint goes.
4) Do the speckling / splattering on a non-carpeted surface that can be easily cleaned. And put paper down over everything. No kidding. I had paint splattered further than I thought possible of my little brush!
5) If you add too much water, you may get some runny paint on your eggs. My purple /gray eggs are a great example of this, but, they still look really cool and got included in my decor! :)
Step 5: Let Them Dry... Then Decorate!
Hope you all enjoyed this DIY project and get to try it out yourself! Let me know your thoughts, tips, tricks, Easter decor ideas, and whether or not you tried it in the comments below! :)
Thanks as always,
Chelle Elle
“Chelle Elle” has been drawing since she was really small. No restaurant napkin was ever safe when crayons were involved! Now, she writes and illustrates characters and other fun ideas to help her dreams and the dreams of others come to life! And yes, she takes commissions and would love to hear from you.
Email her today to learn more about how she can bring your ideas to life at:
Follow her on social media:
Twitter: https://twitter.com/artofchelleelle/
Instagram: https://www.instagram.com/artofchelleelle/
Pinterest: https://www.pinterest.com/artofchelleelle/
DeviantArt: https://artofchelleelle.deviantart.com/


Comments